
One of the biggest changes felt by all businesses in 2020 has been the shift to remote work. As we can no longer meet in shared spaces and large groups, our work has moved online. Workshops are no exception. If you’re used to facilitating Design Thinking workshops in traditional spaces, shifting to remote can feel daunting. Here are 11 tips to help make your remote workshops a success:
- Be conservative about group size
- Use a framework as the agenda
- Bring at least one additional co-facilitator
- Cameras on!
- Use a second screen if you’re a facilitator.
- Leverage technology like Mural or Miro for virtual whiteboarding
- Use a round-robin approach with breakout rooms in Zoom
- Use customer journey mapping tools
- Focus on interaction vs presentation
- Open with an icebreaker
- Accommodate attendees with different communication preferences
1. Be conservative about group size
Keep your group about the same size – or smaller – as you would with a live workshop. It will take longer to get through the exercises, and more people = more time. It’s easy to think that you can add an unlimited number of participants, but we would caution leaders to think twice. While it’s true that there are virtually no room size limitations or travel budgets to contend with; however, consider keeping the roster of participants to as small of a group as possible, but also, large enough to bring the right players to the table.
Keep in mind that you need the subject matter experts in the room where you might bump into blockers and deal-breakers. For example, if your design think workshop will require a scenario where you may need to exchange data with a 2nd party, consider bringing in a lawyer that can help you structure 2nd party data sharing agreements to ensure that you don’t have a set of ideas that are dead on arrival. One of the purposes of the workshop is to identify the major road-blocks, so bring enough SME’s to ensure that you’ve gotten past the major blockers.
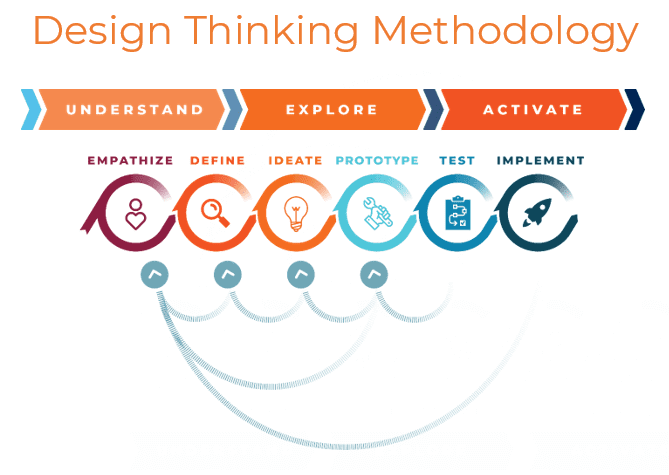 2. Use a framework as the agenda
We need to understand where we are going from the start of the workshop and help participants understand the process that they are about to undertake throughout the design thinking experience. Use our design thinking framework to help you build your agenda.
You can literally assign blocks of time to each of the first 4 sections of the below methodology. Depending on the nature of the scope, you may need a day for each or perhaps you can get through all four areas in a single day.
Reach out to us if you want some help in putting together your agenda.
3. Bring at least one additional co-facilitator
Plan on 2-4 co-facilitators. Facilitators are as helpful in the virtual world as they are in the real world. They can manage the chat, keep track of time, help with technical issues, and generally focus on tasks outside of facilitation that will help to capture all that you need to move your work forward once the workshop is complete.
One of the co-facilitators should be appointed to act as the workshop scribe to capture ideas, parking lot items and next steps.
You may consider designating another facilitator who has a strong understanding of the personalities who will be especially assigned and presented to the group, as the “parliamentarian.” Their role is to gently arrest dialogue that takes the group into directions that are not aligned with the agenda. It’s good to have a “bad-cop” and “good cop” so that folks understand that the group understands that you, as a facilitator, will be flexible with the agenda while respecting the spirit of the planned times that you planned within the day.
You may consider also asking one of the co-facilitators or participants to specifically play the role of devils advocate.
Leverage additional facilitators to lead the virtual break-out rooms which we will cover when we talk about using a round-robin approach to complete some of the rubrics that we’ll be sharing.
4. Cameras on!
It’s not uncommon to join a video conference, only to have everyone keep their video off. Make cameras on mandatory and point out that kids and dogs are all ok given that we are all working from home and life happens, even at work.
5. Use a second screen if you’re a facilitator.
The perfect set-up for both facilitator and participants is two screens; a laptop and an external monitor will do. You can set your video conference on the smaller screen, and the whiteboard on the larger, effectively seeing everything and everyone all at once.
6. Leverage technology like Mural or Miro for virtual white-boarding
Virtual whiteboards can support an experience that feels as collaborative and as engaging as a traditional workshop. In traditional workshops, we generally print out posters that can be as long as 8 feet wide and 3 feet tall. These posters (included below) serve as rubrics for several of the exercises that experienced facilitators will lead for your workshop.
A digital whiteboard software (like Mural or Miro) will allow you to create a virtual wall where participants can place digital post-it notes. All users can open a browser session, bring up the virtual whiteboard, and edit in real-time on a live board. Changes are presented in real-time to all users.
Consider using rubrics like the “Business Model Canvas”, the “Customer Journey Map Template” and the “Customer Journey Canvas” to accelerate brainstorming or what is called, “How Might We” exercises. You can use these rubrics for both virtual and on-premise workshops.
7. Use a round-robin approach with breakout rooms in Zoom
Choose video conferencing software over a traditional conference bridge so that you can all see each other. A platform that allows you to split a large group into smaller groups for team discussions is particularly helpful. Zoom has a feature for Breakout Rooms which is a great example.
An important tool that facilitators use on-premise and online is to break the group up into smaller teams to brainstorm bite-sized exercises. Use the breakout room feature to divide some of the rubrics up by breakout room and give each room a co-facilitator. Then have the participants move between rooms (it’s easier to move the facilitators than the participants by the way). Give 5-20 minutes to complete an assigned sub-section of the rubric in round-robin fashion.
You can also consider using a chat software separate from the video conference. If your company uses Slack or Teams, create a space to support chat and document sharing. If you do decide to use the chat within the conference platform, make sure to save the chat’s as there may be important information that you’ll want to capture.
8. Use customer journey mapping tools
Once you complete some of the rubrics mentioned above, you may need to document a customer journey map or service design blueprint. There are several customer journey mapping tools that we use like. Smaply and Signavio are our favorites depending on the need.
In cases where we need to do process mapping, we prefer to use Signavio. Check out our recent webinar with Signavio, Optimize Customer Experiences with Design Thinking to get an inside view of the tool. We have also included the webinar deck below.
In cases where the customer is focused on focusing on robust backstage and frontstage needs, we might recommend Smaply. Keep in mind, it’s important to build customer journey maps by persona.
Smaply also allows you to map the customers emotional journey, or in other words, their customer satisfaction score at each stage of the storyboard, as well as their dramatic arc, which shows the level of intensity of the user at each stage. It also is very customizable, and you can add additional lanes depending on the needs of your organization.
Each of these tools allows for multiple users to collaborate online, making remote design thinking workshops possible. Many of these tools have collaborative features and the ability to create PDFs as direct downloads from the canvas. In the case with Smaply, you can even re-format how the PowerPoints will be formatted with the elements from the journey map so that each stage of the storyboard has all of the associated attributes neatly laid out on one slide per storyboard stage. This feature can save you a lot of time if you plan on presenting the workshop deliverables after the workshop.
9. Focus on interaction vs presentation
Try to keep presentation content to a minimum. For the same reasons that you want to keep your session short, you also want to focus as much as you can on participants interacting and co-creating. If you do need to present materials, try to intersperse it with activity, or front-load it into the early part of the day when participants are fresh.
Use practical exercises and rubrics we presented above to keep the meeting interactive.
10. Open with an icebreaker
Consider asking everyone to open the virtual whiteboard, add their name and their superpower to a post-it note. Then go around the room and have everyone explain their reason for choosing that superpower. Part of the exercise is to get folks used to using the virtual whiteboard – so facilitators are making the icebreaker perform double-duty, to familiarize participants with the tools we’ll be using later.
11. Accommodate attendees with different communication preferences
Roughly 65% of the population are visual learners, meaning whiteboards, project maps and images are your best bet in terms of communicating with them, stressing the importance of using available technologies. 1
Approximately 30% of people learn auditorily and can remember almost ¾ of everything they hear. 2 For these people, virtual meetings are more productive.
Along with using tools like the virtual whiteboard, consider using features like the “chat” and “poll” to engage the introverts and participants that don’t want to jump into the fray of getting “air-time” in a Zoom meeting.
Assign one of your co-facilitators to ensure that the less vocal participants can be heard. Your co-facilitator should stay focused on the chat, and interrupt where necessary to lead the dialogue with a gentle hand. This ensures that all voices as well as communication styles are welcome and honored.
If you are interested in learning more about conducting remote design thinking workshops, we genuinely enjoy facilitating them.
Please feel free to reach out to us, we would love to help you pull off your next design thinking initiative.
- https://www.inc.com/molly-reynolds/how-to-spot-visual-auditory-and-kinesthetic-learni.html#:~:text=Around%2030%20percent%20of%20the,to%2075%20percent%20of%20it.
- https://www.inc.com/molly-reynolds/how-to-spot-visual-auditory-and-kinesthetic-learni.html#:~:text=Around%2030%20percent%20of%20the,to%2075%20percent%20of%20it.


